Difference between revisions of "Dataset Tutorial"
(Update information with new ontology) |
|||
| (14 intermediate revisions by the same user not shown) | |||
| Line 1: | Line 1: | ||
| − | This tutorial is meant to get you started with uploading and editing a dataset onto the LinkedEarth platform | + | This tutorial is meant to get you started with uploading and editing a dataset onto the LinkedEarth platform. |
After completing this tutorial, you will be able to: | After completing this tutorial, you will be able to: | ||
| − | * | + | * Upload LiPD datasets and enter basic metadata for the record. |
| − | + | *Annotate a dataset: Create and reuse properties for annotation. | |
| − | *Annotate | + | |
| − | + | ||
| − | + | When annotating a dataset, the LinkedEarth wiki follows some '''nomenclature rules''' that you can find on [[Best Practices | this page]]. | |
| − | + | ||
| − | + | ||
| − | + | ||
| − | + | ||
| − | + | ||
| − | + | ||
| − | + | ||
| − | [[ | + | |
= LiPD and LinkedEarth = | = LiPD and LinkedEarth = | ||
| − | The [ | + | The [[LinkedEarth Ontology]] represents the backbone of the wiki. The ontology allows us to not only define terms commonly used to describe a paleoclimate dataset (e.g., variable, uncertainty, calibration) but also specify the relationship among these terms (e.g., a variable has uncertainty). As such, it allows us to make inferences, support complex queries, as well as perform quality control on the data. '''Remember that no formal knowledge about ontologies is required to use and contribute to the wiki!''' |
| − | The LinkedEarth ontology was developed from the [ | + | The LinkedEarth ontology was developed from the [[Linked Paleo Data]] (LiPD) format championed by Nick McKay and Julien Emile-Geay. Therefore, the wiki platform is currently optimized to accept data already in this format. To convert you dataset into a LiPD file, follow [[Creating a LiPD file | this guide]]. |
== Uploading a LiPD file == | == Uploading a LiPD file == | ||
| − | You need to be logged in to | + | You need to be '''logged in''' to upload a LiPD file, using this [[Special:WTLiPD | special page]] dedicated to the management of datasets already in the LiPD format. This page can be access directly from the left sidebar: [[Special:WTLiPD | Managing LiPD files]]. |
| − | + | ||
| − | + | ||
| − | + | Select the browse button and choose the .lpd file you want to upload as shown in Figure 1: | |
| − | + | [[File:TutorialFig2.png|thumb|none|1000px|Figure1: Manage LiPD Data page]] | |
| + | |||
| + | Dataset pages will be automatically created from the content of the LiPD file and your dataset will appear at the top of the "Current LiPD Dataset list" on the [[Main Page]]. By clicking on the dataset link, you will be able to see the automatically extracted data and metadata from the LiPD file, as shown in Figure 2. New "crowd" properties will be automatically created from the LiPD file if these properties are not in the current ontology. | ||
[[File:TutorialFigure3.png|thumb|none|1000px|Figure2: Wiki page created automatically from the metadata of the LiPD dataset]] | [[File:TutorialFigure3.png|thumb|none|1000px|Figure2: Wiki page created automatically from the metadata of the LiPD dataset]] | ||
| Line 36: | Line 26: | ||
Congratulations! Your LiPD file has been successfully added to the Linked Earth wiki. | Congratulations! Your LiPD file has been successfully added to the Linked Earth wiki. | ||
| − | + | == Annotating a LiPD file == | |
| + | Once a LiPD file is uploaded, the metadata about that file is shown in a table-like manner on the page with two columns. The column on the left of each table contains the properties describing the LiPD file, while the column on the right states the value associated with each property. Figure 3 shows an example, where the "archive type" of CAN9Neukom2014 is "Tree". You can also click on the property to access its definition in the [[LinkedEarth Ontology]]. Properties followed by (L) indicates that they are part of the [[Linked Paleo Data | LiPD architecture]] and, therefore, cannot be directly edited by basic editors of the LinkedEarth community. | ||
| − | + | Please check that the metadata for your record is correct and edit it if appropriate. For instance, to add an investigator to the CAN9Neukom2014 dataset in Figure 2, click on its corresponding row as indicated in Figure 3. Then type the value of the property. In this example, we added "Daniel" as the investigator. | |
| − | + | ||
| − | + | [[File:TutorialFig4.png|thumb|none|1000px|Figure 3: Editing a property value for a LiPD file]] | |
| − | + | All annotated values can be edited or removed. To remove "Daniel" from the investigators of the example dataset, click on the row and on the red cross button of the left as shown in Figure 4: | |
| − | + | [[File:TutorialFig5.png|thumb|none|800px|Figure 4: Deleting a property from a dataset]] | |
| − | + | Each property/property value added to the page is tracked on the page history. The page history is accessible through the "View history" button at the top of any wiki page, allowing to monitor the edits done by other wiki users. Figure 5 illustrates the edits for the CAN9Neukom 2014 dataset: the latest change added a propertyValue adding "Daniel" as an investigator. | |
| − | + | Anyone with basic editor privileges and logged into the wiki can edit property values. Don't worry, all changes are revertible and you will get an automatic email if anyone changes a page in your watchlist. | |
| − | + | [[File:TutorialFig6.png|thumb|none|800px|Figure 5: History of the edits done to the CAN9Neukon2014 dataset]] | |
| − | [[ | + | If there is a disagreement between two researchers, a discussion may be started on the "Discussion" page, as depicted on Figure 6. To learn more about how to contribute and edit discussion pages, follow this [[Discussion Page Tutorial | tutorial]]. |
| − | + | [[File:TutorialFig7.png|thumb|none|600px|Figure 6: Creating a discussion page on CAN9Neukon2014 dataset]] | |
| − | + | Contributions is tracked automatically on the wiki and displayed in the "Credit" section, which can be found at the bottom of each wiki page. | |
| − | + | [[File:TutorialFig8.png|thumb|none|600px|Figure 7: credits of the CAN9Neukon2014 dataset]] | |
| − | + | ||
| − | [[File:TutorialFig8.png|thumb|none|600px|Figure | + | |
| − | + | ||
| − | + | ||
| − | + | ||
| − | + | ||
| − | + | ||
| − | + | ||
== Concept annotation in a LiPD file == | == Concept annotation in a LiPD file == | ||
| − | |||
| − | + | As shown in Figures 3 and 4, some of the annotated values like "Tree" already have links to other pages. These pages can be further populated and edited by domain experts. To do so click on the Edit tab at the top of the page as shown on Figure 8 for the "Tree" archive. The article was created as a stub, awaiting domain experts' contribution, further gathering field knowledge. | |
| − | + | To learn more about Wiki editing, visit the [[Quick Guide to Editing Wiki Pages]]. | |
| − | + | By linking to other existing pages we can connect different LiPD datasets (e.g., if two different datasets are of the same archive type, they will link to the same page) and support queries. For instance, one can look for all the datasets on the LinkedEarth wiki using "Tree" as archives. | |
| − | + | Red links means that the page does not yet exist. Editors can create the new page and edit its content. An example can be seen on Figure 9. | |
| − | [[File: | + | [[File:TutorialFig9.png|thumb|none|700px|Figure 8: Tree concept definition on the Linked Earth wiki]] |
| − | + | [[File:TutorialFig10.png|thumb|none|700px|Figure 9: Creating a page for an unexisting concept (highlighted in red)]] | |
| + | =Annotate a dataset= | ||
| − | = | + | == Property annotation == |
| + | Until now we have covered how to annotate property values and associate them to concepts and existing pages in the wiki. In this next step we will see how to create new properties to describe a dataset, i.e., adding new annotations to our dataset outside of the standard properties shown in Figure 2. | ||
| − | + | The "Properties" box, placed under the "Standard Properties" table, allows users to edit and create new properties and values. An example is shown in Figure 10. By clicking on the "plus" sign in the title, a new row will appear on the table. The row has two fields, one for adding the property name we want to use to describe the dataset (e.g., title, description, name, etc.) and another row for inserting the property value. | |
| − | + | ||
| − | + | [[File:TutorialFig11.png|thumb|none|600px|Figure 10: adding a property for the LiPD file in Figure 3]] | |
| − | + | ||
| − | [[File:TutorialFig11.png|thumb|none|600px|Figure | + | |
Before adding a new property name, it is important to note that a similar property may already exist in the ontology to describe the same metadata. '''The properties are case-sensitive.''' For instance, imagine that we want to add a "description" to the dataset. If we start typing the property, we see that it already exists, and we can select it for our purposes. Selecting existing properties is important, as it helps to structure and control the content uploaded to the wiki. | Before adding a new property name, it is important to note that a similar property may already exist in the ontology to describe the same metadata. '''The properties are case-sensitive.''' For instance, imagine that we want to add a "description" to the dataset. If we start typing the property, we see that it already exists, and we can select it for our purposes. Selecting existing properties is important, as it helps to structure and control the content uploaded to the wiki. | ||
| − | |||
| − | |||
== Adding location to a dataset == | == Adding location to a dataset == | ||
| − | + | The LinkedEarth wiki automatically add a new dataset to an existing query page, such as the one on our [[Main Page]], provided that the dataset contains a set of coordinates. To do so, first link the location used to collect the data as illustrated on Figure 11. Any location is valid, from a single point (in a xyz coordinate systems) to a polyline (e.g., a river), or even a polygon (e.g., a mountain, a city or even a country). In the example, we are linking the dataset to the location "Central Andes composite 9", where the data was collected. | |
Once the location page has been created, we can annotate its name and its associated geometry with the property "hasGeometry". This property takes into account the fact that a location may change over time (e.g., a river could change its course), and hence the geometry would change without affecting the location itself. | Once the location page has been created, we can annotate its name and its associated geometry with the property "hasGeometry". This property takes into account the fact that a location may change over time (e.g., a river could change its course), and hence the geometry would change without affecting the location itself. | ||
| − | Finally, we add the coordinates to the Geometry (if the page doesn't exist already). For this we use the AsWKT property, which indicates to the system that the coordinates are in | + | Finally, we add the coordinates to the Geometry (if the page doesn't exist already). For this we use the AsWKT property, which indicates to the system that the coordinates are in the [https://en.wikipedia.org/wiki/Well-known_text Well Known Text format]. Since in this case we are representing a point, we also add type "Point" as property for the geometry. |
| − | + | ||
| − | + | ||
| − | + | ||
| − | + | ||
| − | + | ||
| − | + | ||
| − | + | ||
| − | + | ||
| − | + | ||
| − | + | ||
| − | + | ||
| − | + | ||
| − | + | ||
| − | + | ||
| − | + | ||
| − | + | ||
| − | + | ||
| − | + | ||
| − | + | ||
| − | + | ||
| − | + | ||
| − | + | ||
| − | + | ||
| − | + | ||
| − | + | ||
| − | + | ||
| − | + | ||
| − | + | ||
| − | + | ||
| − | + | ||
| − | + | ||
| − | + | ||
| − | + | ||
| − | + | ||
| − | + | ||
| − | + | ||
| − | + | ||
| − | + | ||
| − | + | ||
| − | + | ||
| − | + | ||
| − | + | ||
| − | + | ||
| − | + | ||
| − | + | ||
| − | + | ||
| − | + | ||
| − | + | ||
| − | + | ||
| − | + | ||
| − | + | ||
| − | + | ||
| − | + | ||
| − | + | ||
| − | + | ||
| − | + | ||
| − | + | ||
| − | + | ||
| − | + | ||
| − | + | ||
| − | + | ||
| − | + | ||
| − | + | ||
| − | + | ||
| − | + | ||
| − | + | ||
| − | + | ||
| − | + | ||
| − | + | ||
| − | + | ||
| − | + | ||
| − | + | ||
| − | + | ||
| − | + | ||
| − | + | ||
| − | + | ||
| − | + | ||
| − | + | ||
| − | + | ||
| − | + | ||
| − | + | ||
| − | + | ||
| − | + | ||
| − | + | ||
| − | + | ||
| − | + | ||
| − | + | ||
| − | + | ||
| + | [[File:TutorialFig24.png|thumb|none|700px|Figure 11: Steps for adding location to your dataset.]] | ||
| − | = | + | == See Also == |
| − | + | ||
| − | + | * [[Quick Guide to Editing Wiki Pages]] | |
| + | * [[Discussion Page Tutorial]] | ||
| + | * [[Best Practices]] | ||
| + | * [[Creating a LiPD file]] | ||
Latest revision as of 22:32, 3 May 2017
This tutorial is meant to get you started with uploading and editing a dataset onto the LinkedEarth platform.
After completing this tutorial, you will be able to:
- Upload LiPD datasets and enter basic metadata for the record.
- Annotate a dataset: Create and reuse properties for annotation.
When annotating a dataset, the LinkedEarth wiki follows some nomenclature rules that you can find on this page.
Contents
LiPD and LinkedEarth
The LinkedEarth Ontology represents the backbone of the wiki. The ontology allows us to not only define terms commonly used to describe a paleoclimate dataset (e.g., variable, uncertainty, calibration) but also specify the relationship among these terms (e.g., a variable has uncertainty). As such, it allows us to make inferences, support complex queries, as well as perform quality control on the data. Remember that no formal knowledge about ontologies is required to use and contribute to the wiki!
The LinkedEarth ontology was developed from the Linked Paleo Data (LiPD) format championed by Nick McKay and Julien Emile-Geay. Therefore, the wiki platform is currently optimized to accept data already in this format. To convert you dataset into a LiPD file, follow this guide.
Uploading a LiPD file
You need to be logged in to upload a LiPD file, using this special page dedicated to the management of datasets already in the LiPD format. This page can be access directly from the left sidebar: Managing LiPD files.
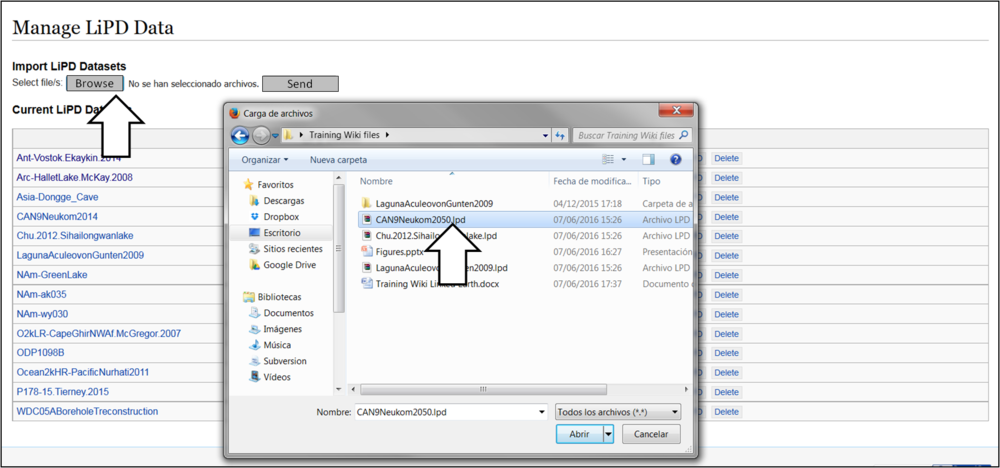
Select the browse button and choose the .lpd file you want to upload as shown in Figure 1:
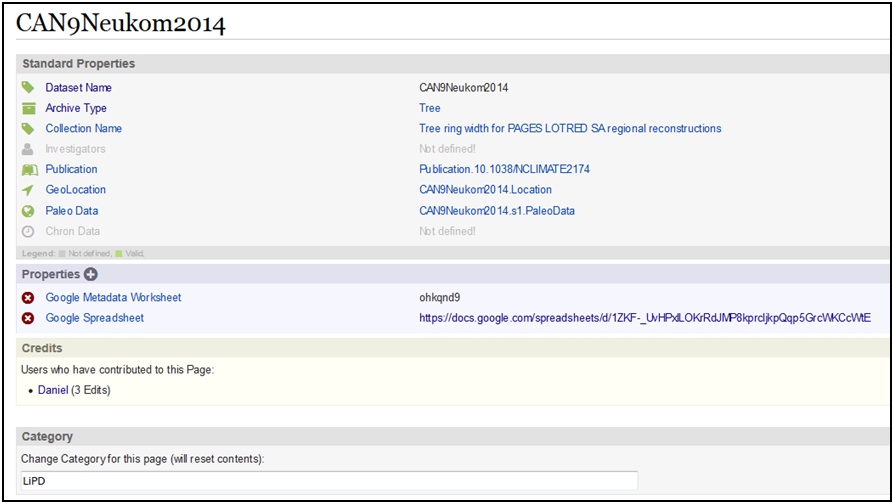
Dataset pages will be automatically created from the content of the LiPD file and your dataset will appear at the top of the "Current LiPD Dataset list" on the Main Page. By clicking on the dataset link, you will be able to see the automatically extracted data and metadata from the LiPD file, as shown in Figure 2. New "crowd" properties will be automatically created from the LiPD file if these properties are not in the current ontology.
Congratulations! Your LiPD file has been successfully added to the Linked Earth wiki.
Annotating a LiPD file
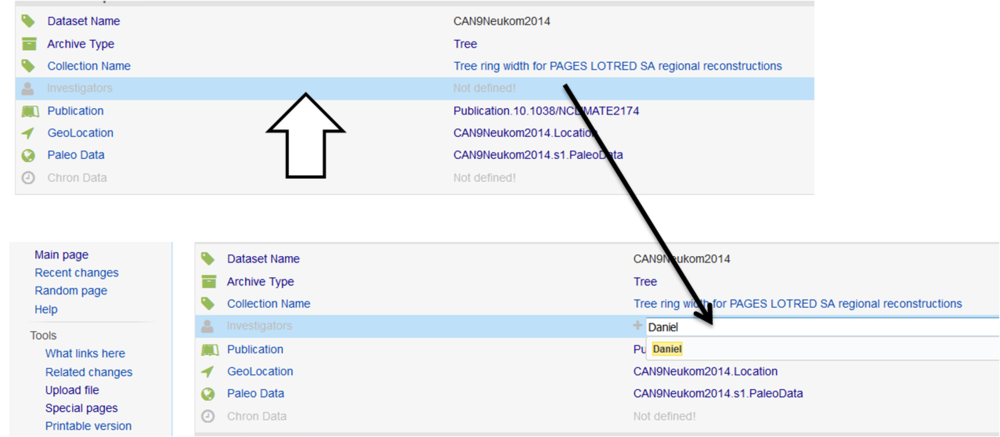
Once a LiPD file is uploaded, the metadata about that file is shown in a table-like manner on the page with two columns. The column on the left of each table contains the properties describing the LiPD file, while the column on the right states the value associated with each property. Figure 3 shows an example, where the "archive type" of CAN9Neukom2014 is "Tree". You can also click on the property to access its definition in the LinkedEarth Ontology. Properties followed by (L) indicates that they are part of the LiPD architecture and, therefore, cannot be directly edited by basic editors of the LinkedEarth community.
Please check that the metadata for your record is correct and edit it if appropriate. For instance, to add an investigator to the CAN9Neukom2014 dataset in Figure 2, click on its corresponding row as indicated in Figure 3. Then type the value of the property. In this example, we added "Daniel" as the investigator.
All annotated values can be edited or removed. To remove "Daniel" from the investigators of the example dataset, click on the row and on the red cross button of the left as shown in Figure 4:
Each property/property value added to the page is tracked on the page history. The page history is accessible through the "View history" button at the top of any wiki page, allowing to monitor the edits done by other wiki users. Figure 5 illustrates the edits for the CAN9Neukom 2014 dataset: the latest change added a propertyValue adding "Daniel" as an investigator.
Anyone with basic editor privileges and logged into the wiki can edit property values. Don't worry, all changes are revertible and you will get an automatic email if anyone changes a page in your watchlist.
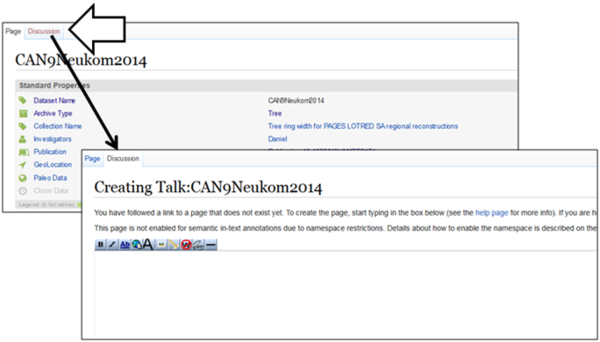
If there is a disagreement between two researchers, a discussion may be started on the "Discussion" page, as depicted on Figure 6. To learn more about how to contribute and edit discussion pages, follow this tutorial.
Contributions is tracked automatically on the wiki and displayed in the "Credit" section, which can be found at the bottom of each wiki page.
Concept annotation in a LiPD file
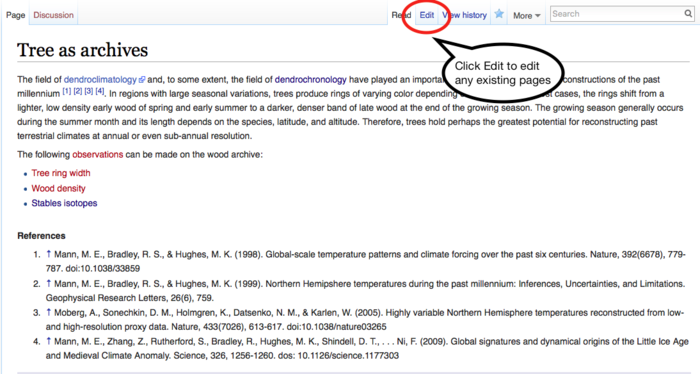
As shown in Figures 3 and 4, some of the annotated values like "Tree" already have links to other pages. These pages can be further populated and edited by domain experts. To do so click on the Edit tab at the top of the page as shown on Figure 8 for the "Tree" archive. The article was created as a stub, awaiting domain experts' contribution, further gathering field knowledge.
To learn more about Wiki editing, visit the Quick Guide to Editing Wiki Pages.
By linking to other existing pages we can connect different LiPD datasets (e.g., if two different datasets are of the same archive type, they will link to the same page) and support queries. For instance, one can look for all the datasets on the LinkedEarth wiki using "Tree" as archives.
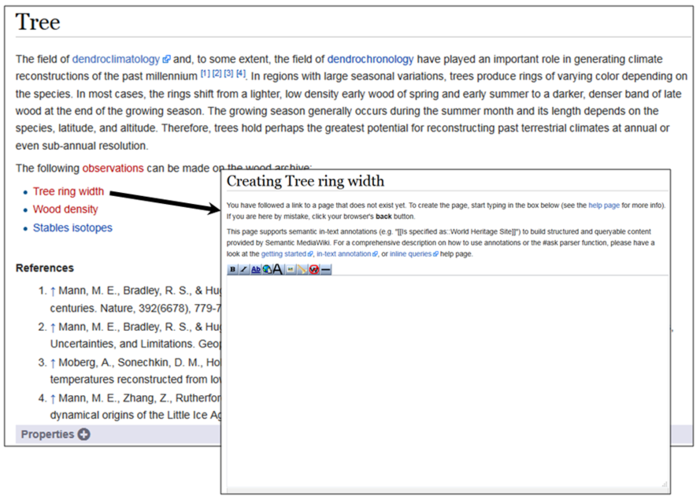
Red links means that the page does not yet exist. Editors can create the new page and edit its content. An example can be seen on Figure 9.
Annotate a dataset
Property annotation
Until now we have covered how to annotate property values and associate them to concepts and existing pages in the wiki. In this next step we will see how to create new properties to describe a dataset, i.e., adding new annotations to our dataset outside of the standard properties shown in Figure 2.
The "Properties" box, placed under the "Standard Properties" table, allows users to edit and create new properties and values. An example is shown in Figure 10. By clicking on the "plus" sign in the title, a new row will appear on the table. The row has two fields, one for adding the property name we want to use to describe the dataset (e.g., title, description, name, etc.) and another row for inserting the property value.
Before adding a new property name, it is important to note that a similar property may already exist in the ontology to describe the same metadata. The properties are case-sensitive. For instance, imagine that we want to add a "description" to the dataset. If we start typing the property, we see that it already exists, and we can select it for our purposes. Selecting existing properties is important, as it helps to structure and control the content uploaded to the wiki.
Adding location to a dataset
The LinkedEarth wiki automatically add a new dataset to an existing query page, such as the one on our Main Page, provided that the dataset contains a set of coordinates. To do so, first link the location used to collect the data as illustrated on Figure 11. Any location is valid, from a single point (in a xyz coordinate systems) to a polyline (e.g., a river), or even a polygon (e.g., a mountain, a city or even a country). In the example, we are linking the dataset to the location "Central Andes composite 9", where the data was collected.
Once the location page has been created, we can annotate its name and its associated geometry with the property "hasGeometry". This property takes into account the fact that a location may change over time (e.g., a river could change its course), and hence the geometry would change without affecting the location itself.
Finally, we add the coordinates to the Geometry (if the page doesn't exist already). For this we use the AsWKT property, which indicates to the system that the coordinates are in the Well Known Text format. Since in this case we are representing a point, we also add type "Point" as property for the geometry.
